Getting Started
If you encounter any issues or have questions or suggestions, please send us an email at abacus@nku.edu.
Abacus works best on Google Chrome, Firefox and Edge. If you are experiencing problems with Abacus, make sure your browser is up to date.
DOR / Consent Forms
Click on a question below to see the answer.
All students in which you believe your instruction is making a direct impact on their learning should be included on the Student List (DOR).
One of the recent enhancements to Abacus is the ability for participants to update student information themselves rather than contacting an Abacus Administrator to make the change. Here is how you can update your student information on your DOR:
-
Start from the "Assignments" page.
-
Click on your Dates of Record (DOR) assignment.
-
Click the "Edit" button on the student that you would like to update.
-
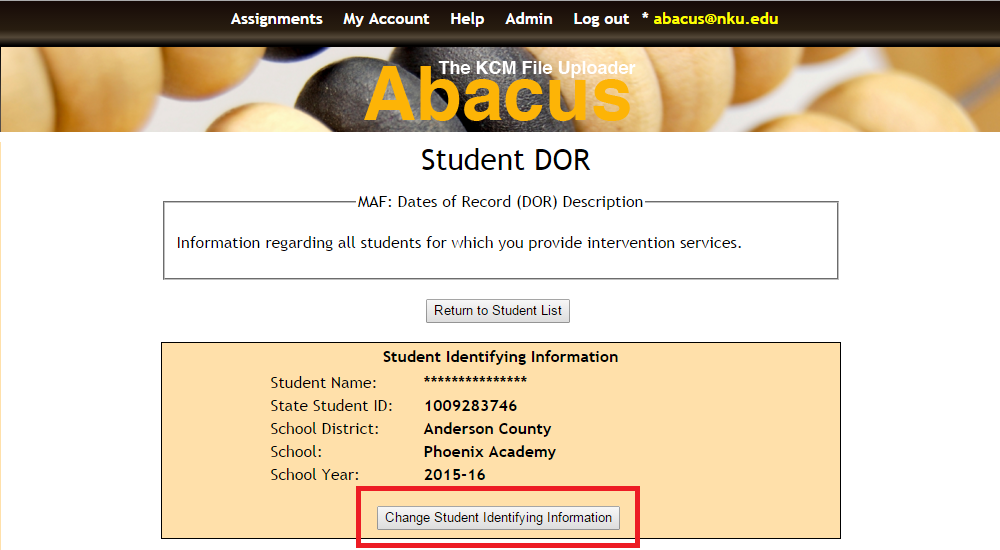
Click the "Change Student Identifying Information" button in the first box.
-
Make any corrections that need to be made in the provided text boxes.
-
Click "Update Student".
Yes. All students should be entered on the DOR, regardless of whether or not a permission slip has been received (explanation in the next drop down). If a student has not returned the permission slip, or the student returned a blank permission slip, please upload a blank permission slip to the DOR. We can then indicate that the student's data cannot be used for research purposes.
Why? The Kentucky Center for Mathematics programs are grant funded and often require quality improvement reports to be shared with the Kentucky Department of Education. Permission slips are not required for quality improvement reports. Permission slips/consent forms are, however, used to identify students whose parents have allowed their child's data and/or photos and videos to be shared for research, presentations, and/or professional development reasons.
NOTE: Please make sure your consent forms include the following information: Student ID, School Name, and the Parent's Signature date (if the parent signed the consent form). The Student ID and School name is to be written in the box in the bottom left corner of the consent form. Not including this information will consider the consent form as invalid.
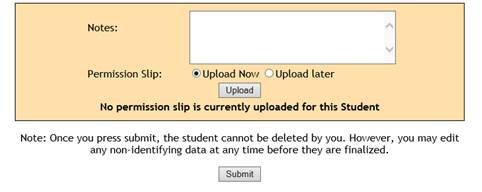
You should see the following message if a permission slip is currently not uploaded or the timestamp has not saved.
-
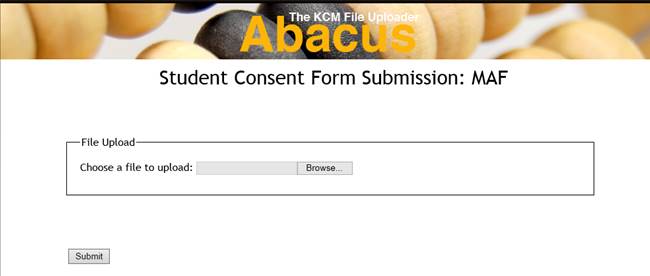
Click 'Browse'
-
Choose the file to upload, and then click 'OK'
-
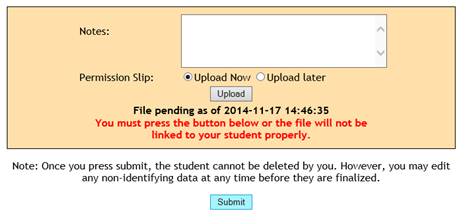
You should now see this page, click 'Submit'.
-
You will now be directed back to the Main DOR screen.
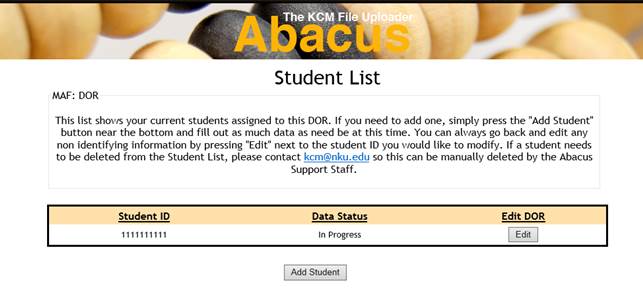
-
Click 'Edit' and scroll down. You should see the uploaded date and time:
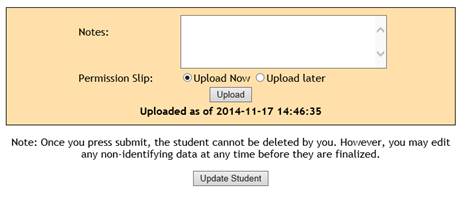
NOTE: Please make sure your consent forms include the following information: Student ID, School Name, and the Parent's Signature date (if the parent signed the consent form). The Student ID and School name is to be written in the box in the bottom left corner of the consent form. Not including this information will consider the consent form as invalid.
-
Log into Abacus
-
Click 'DOR' to enter your DOR
-
Click 'Edit DOR' to add a permission slip for a student that has already been enteredOr Click 'Add Student' to add a permission slip and enter information for a student that has not been entered on your DOR
-
At the bottom of the screen, click 'upload'
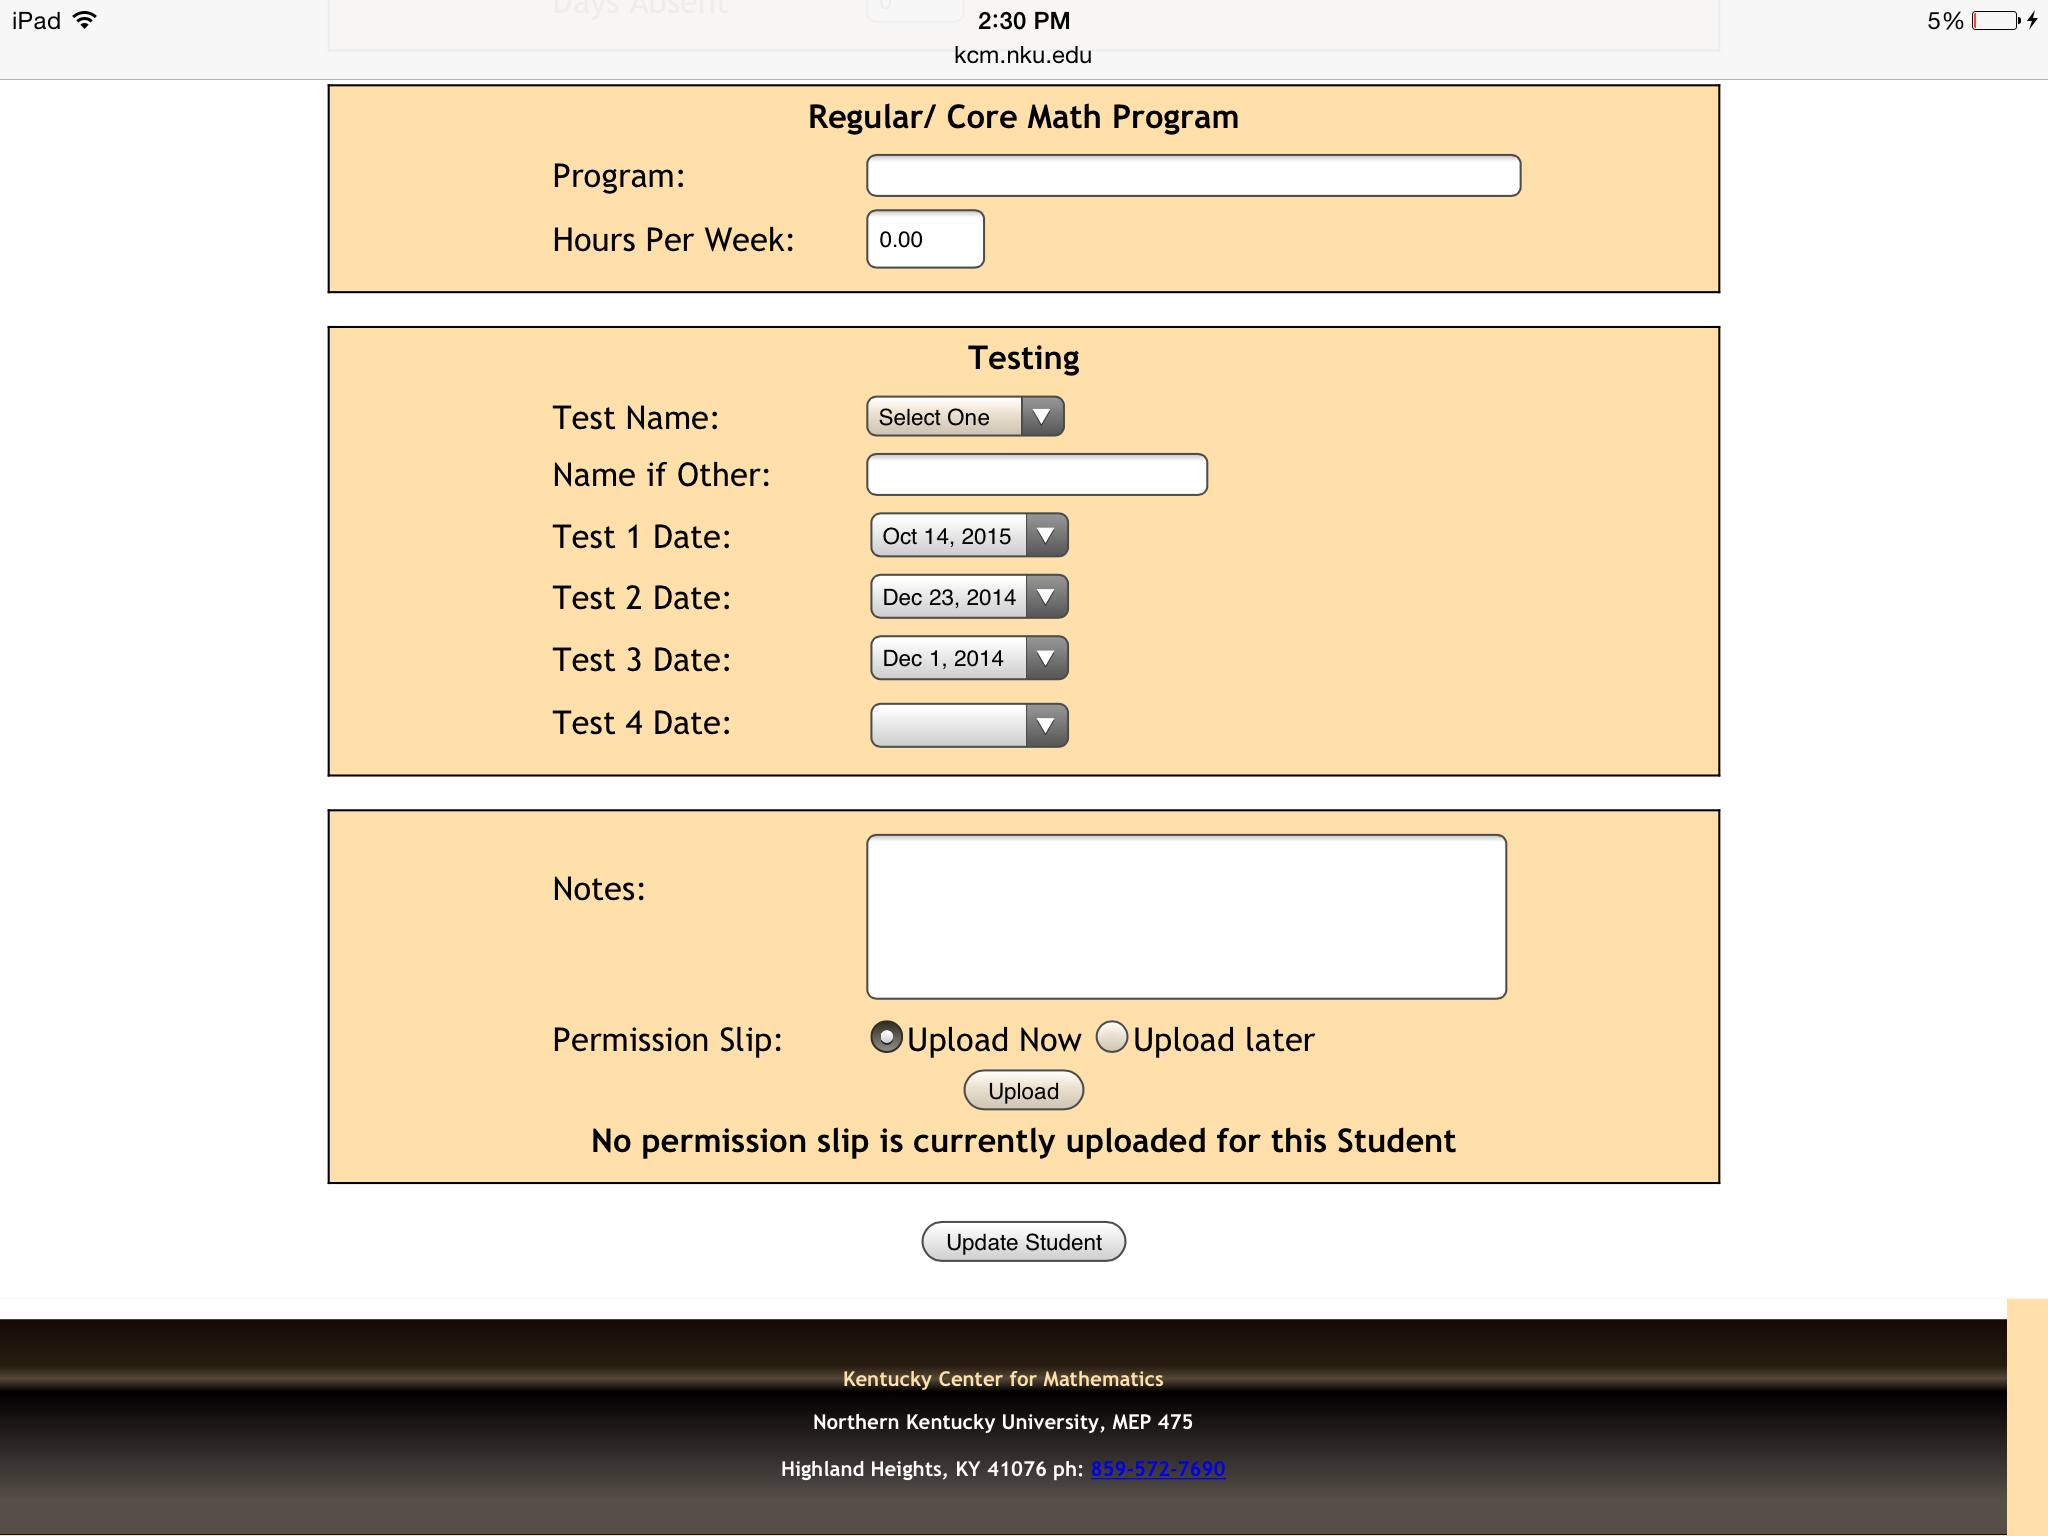
-
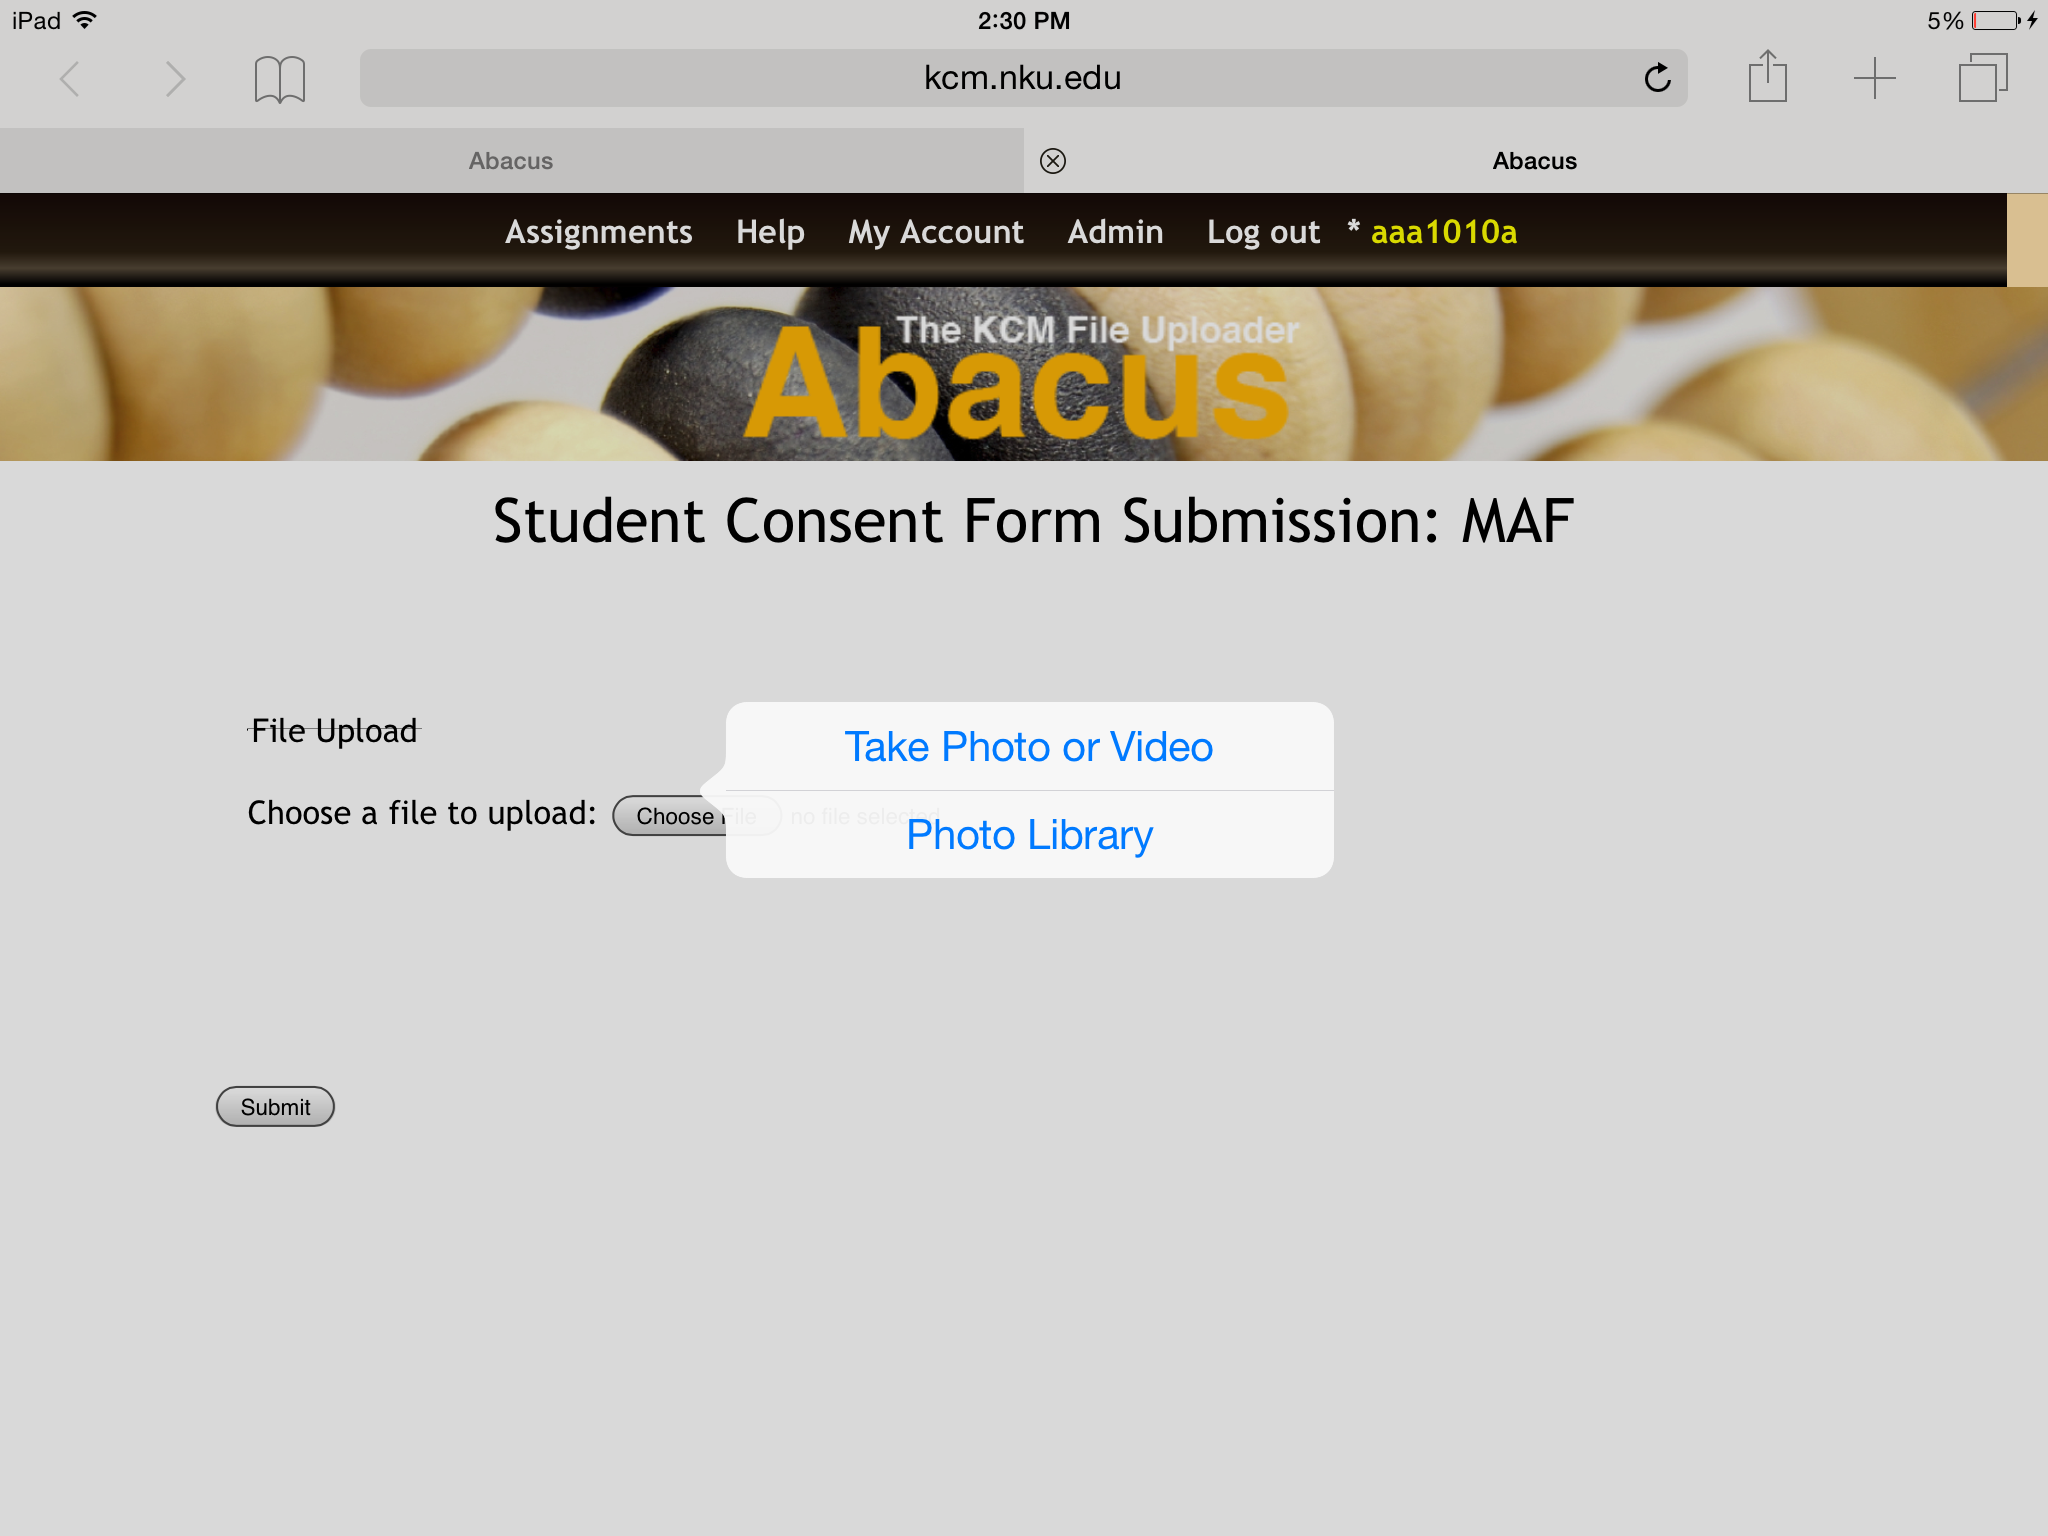
Click 'Choose File'
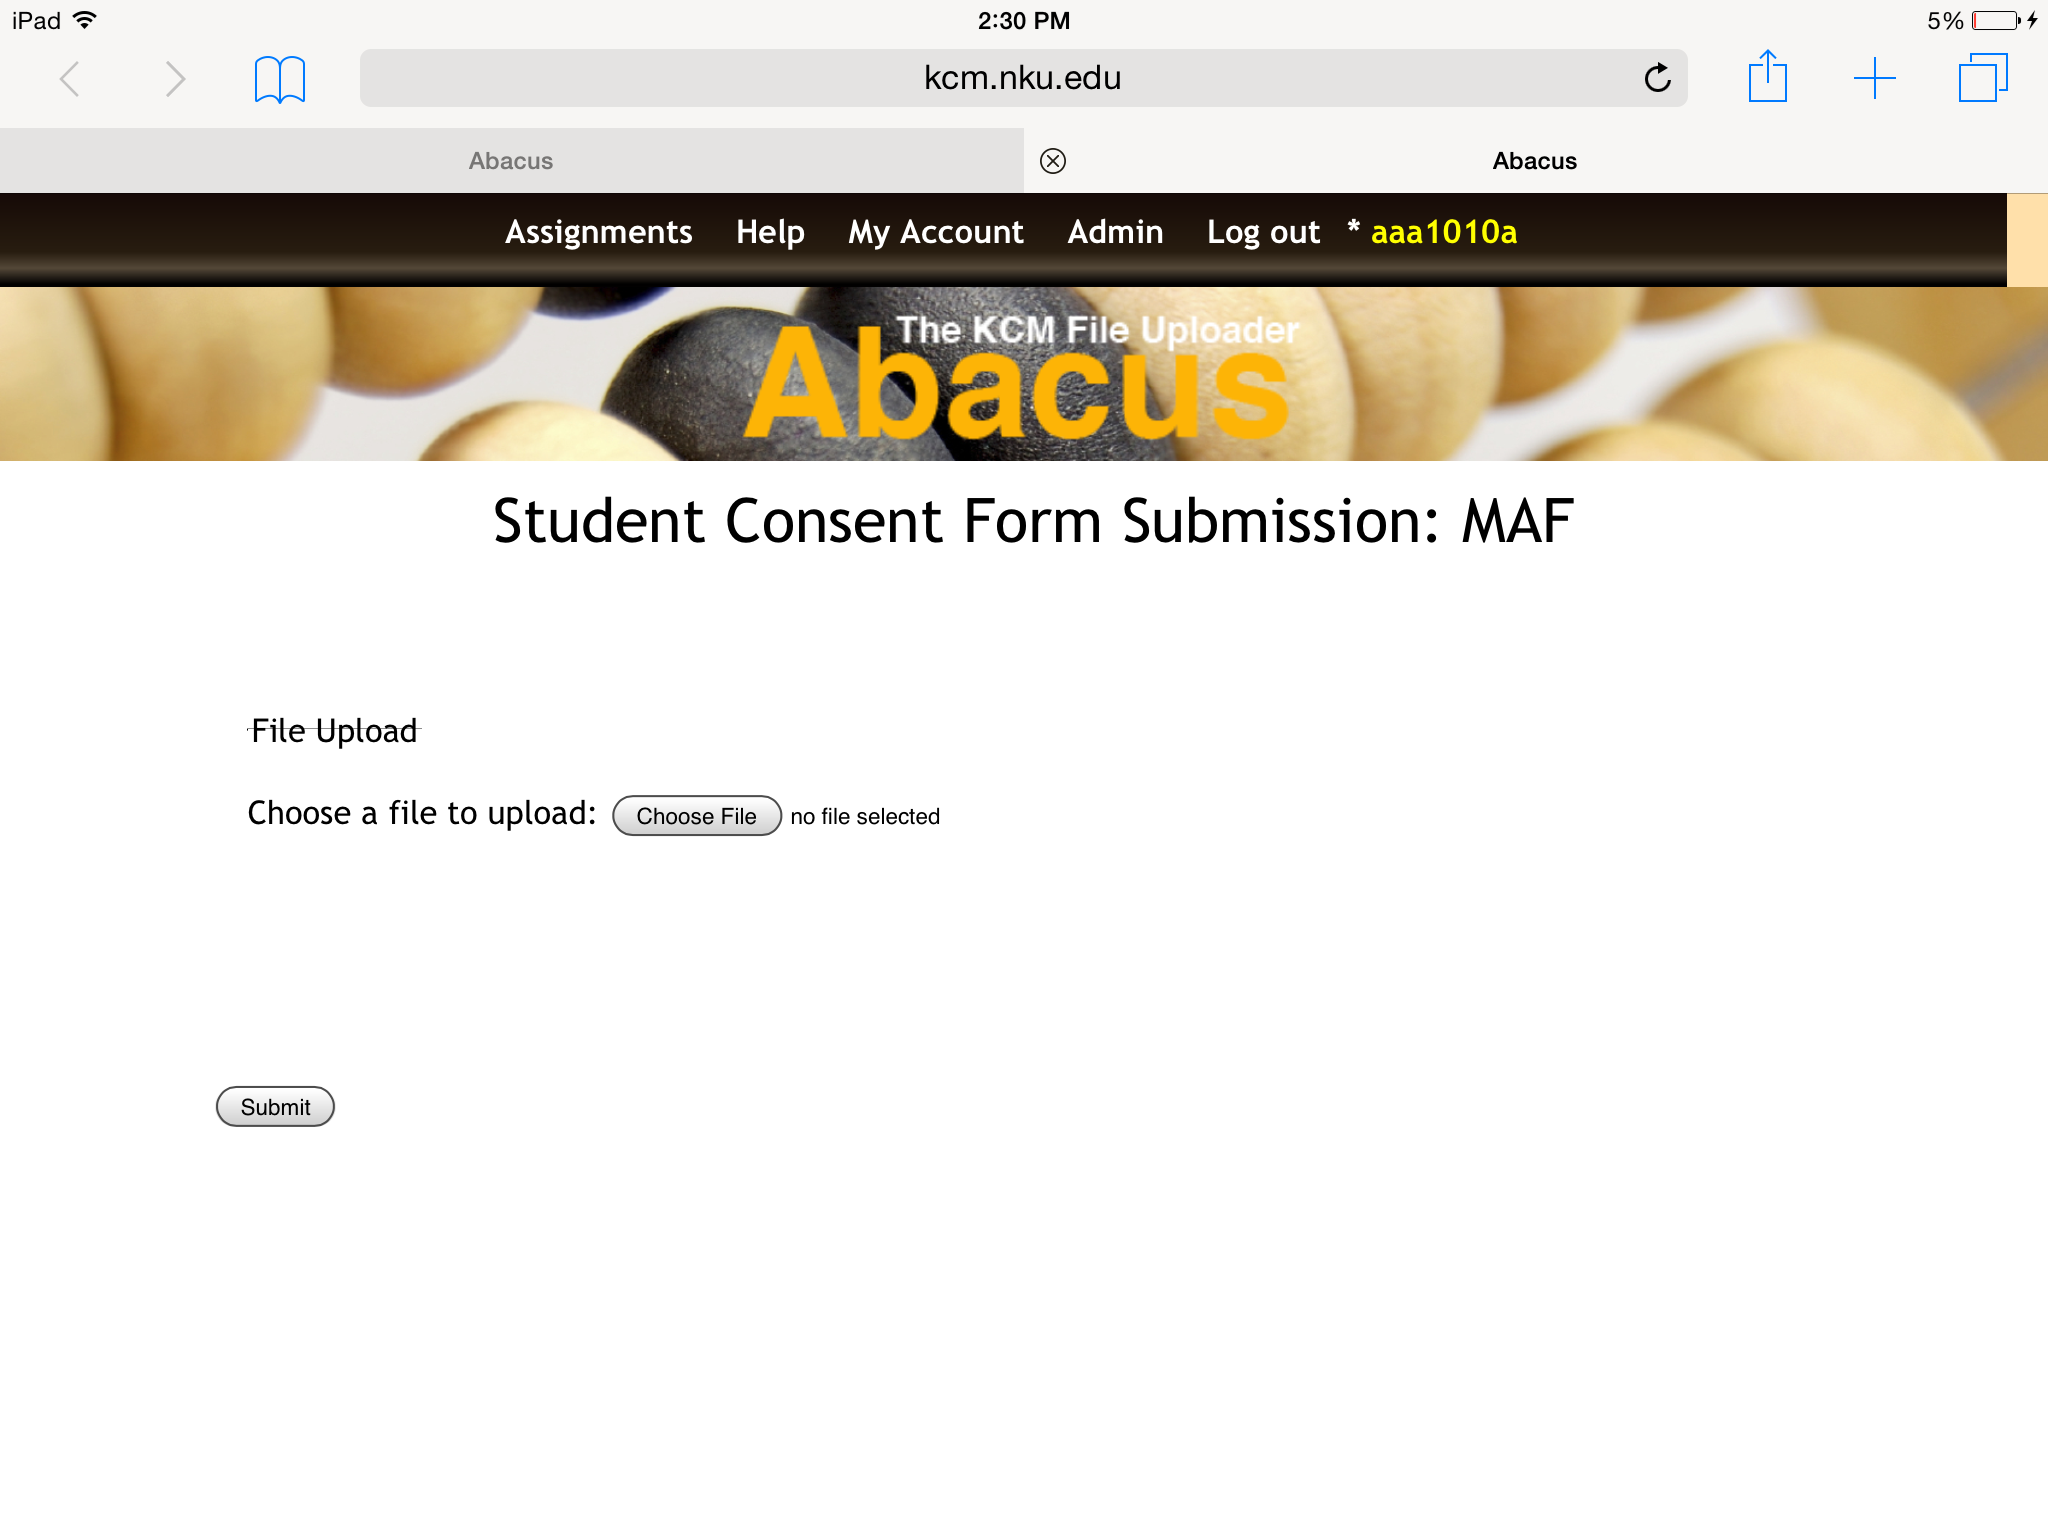
-
Click 'Take a Photo or Video' and take the picture of the consent form or choose 'Photo Library' and select the picture of the consent form if you have already taken a photo of the permission slip
-
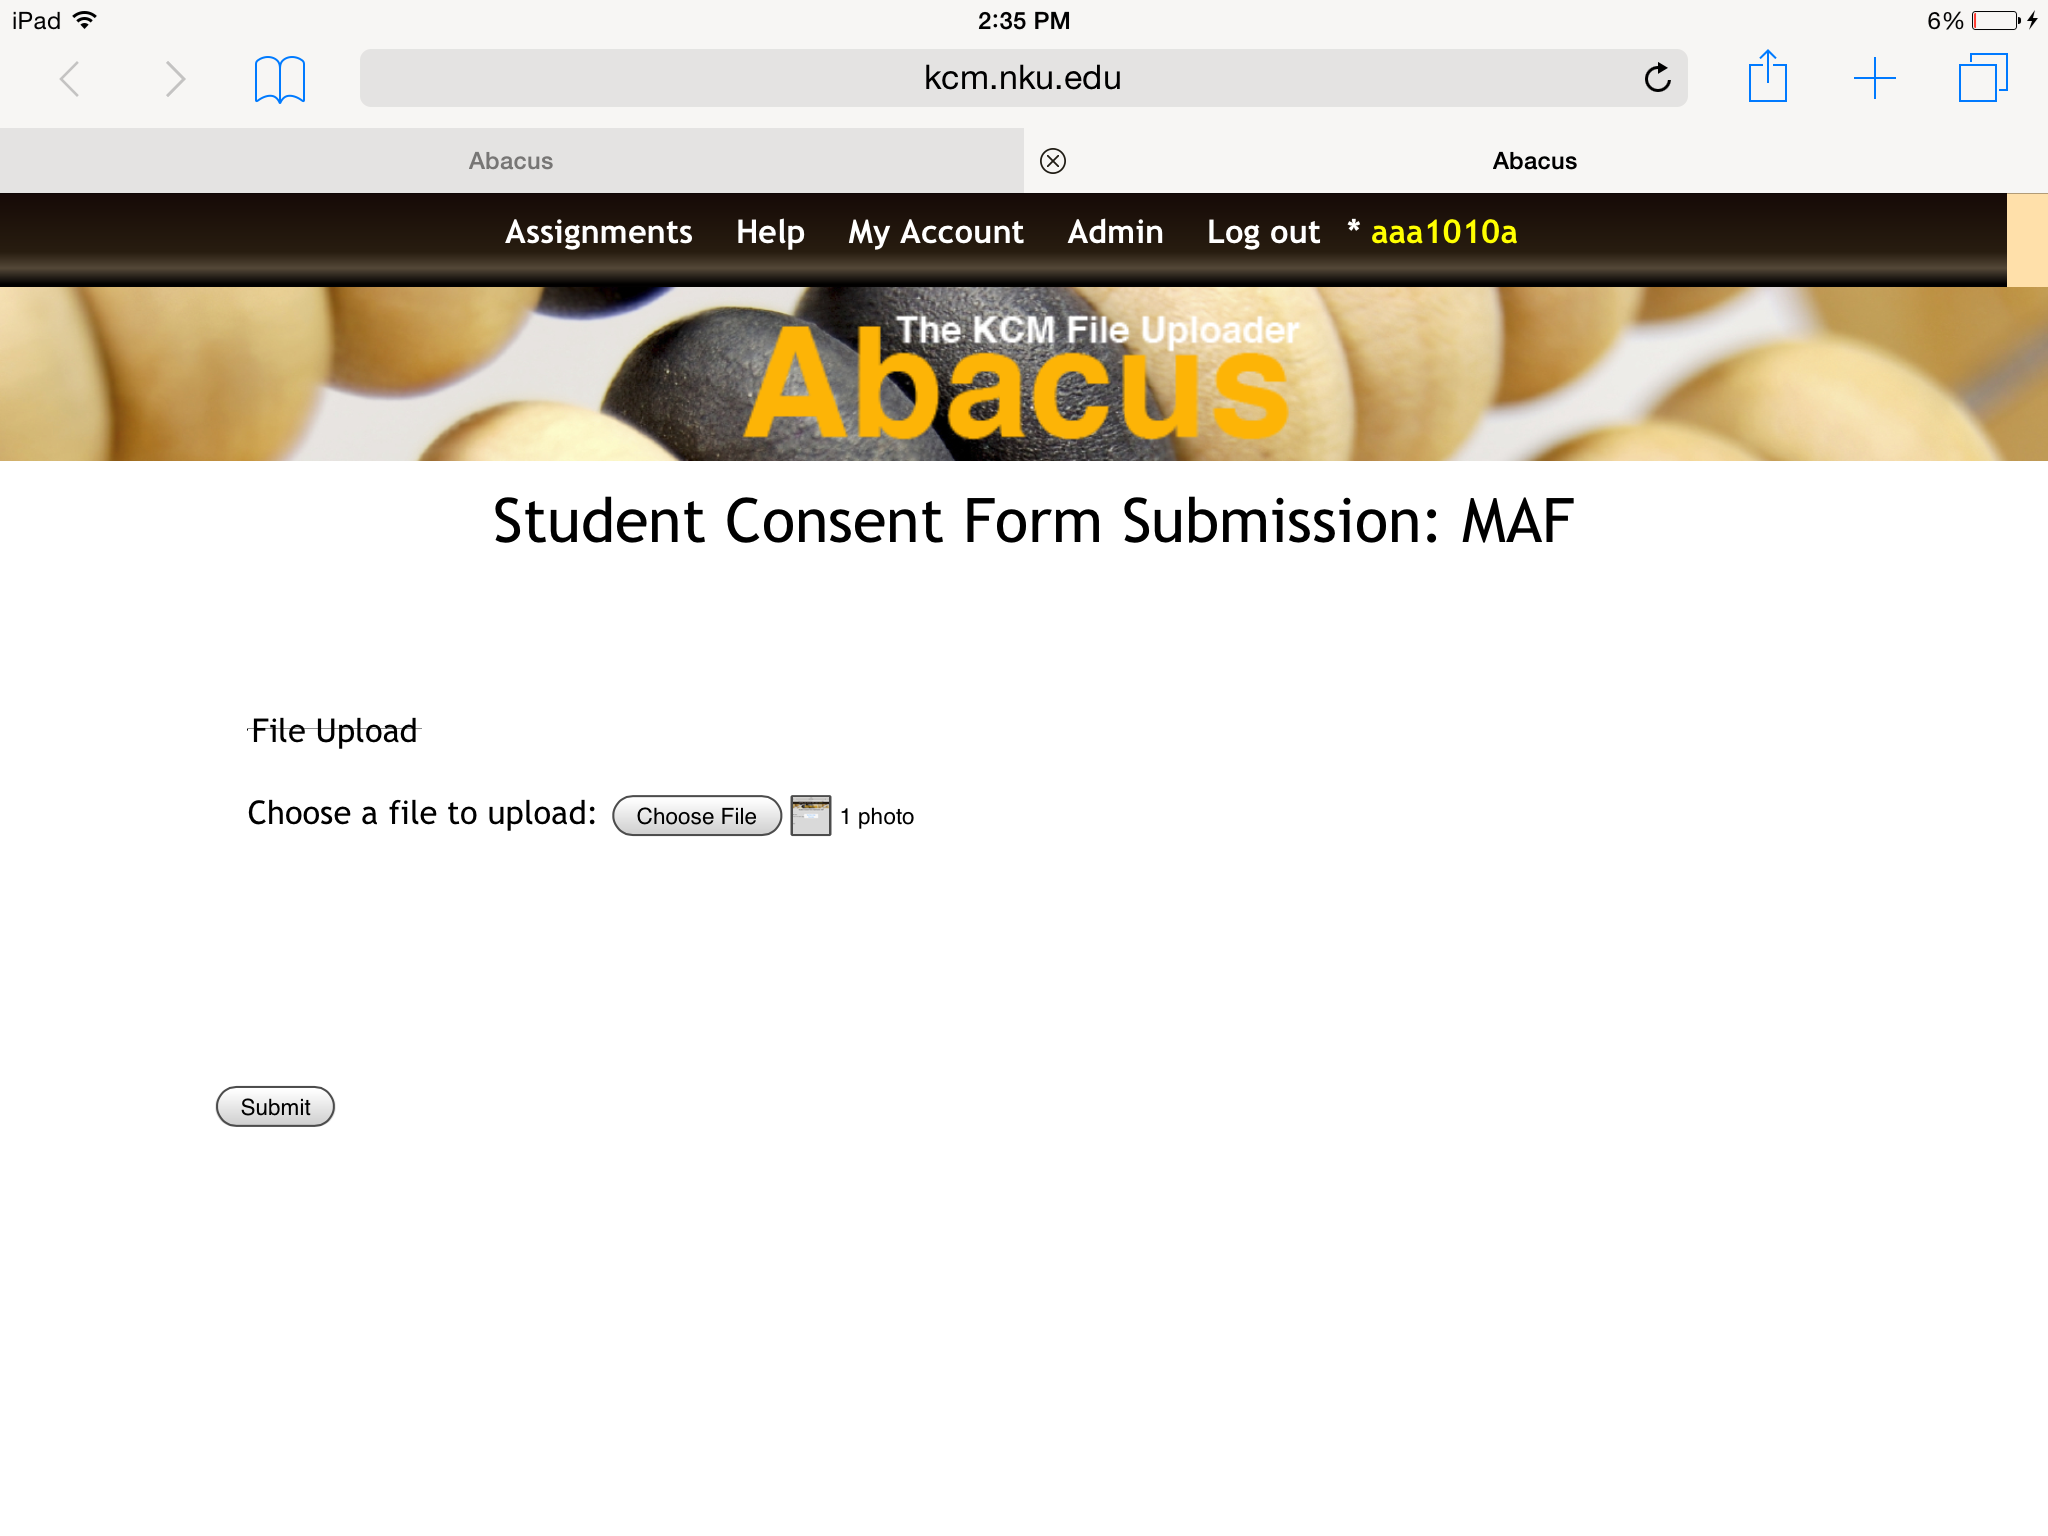
Click 'Use Photo' if you just took a picture with your camera
-
Click 'Submit'
-
Click 'OK'
-
Click 'Update Student' or 'Submit'
-
You will now be directed to the Student List screen, choose or add the next student you would like to add a permission slip for.
NOTE: Please make sure your consent forms include the following information: Student ID, School Name, and the Parent's Signature date (if the parent signed the consent form). The Student ID and School name is to be written in the box in the bottom left corner of the consent form. Not including this information will consider the consent form as invalid.
-
Log into Abacus
-
Click 'DOR' to enter your DOR
-
Click 'Edit DOR' to add a permission slip for a student that has already been entered or Click 'Add Student' to add a permission slip and enter information for a student that has not been entered on your DOR
-
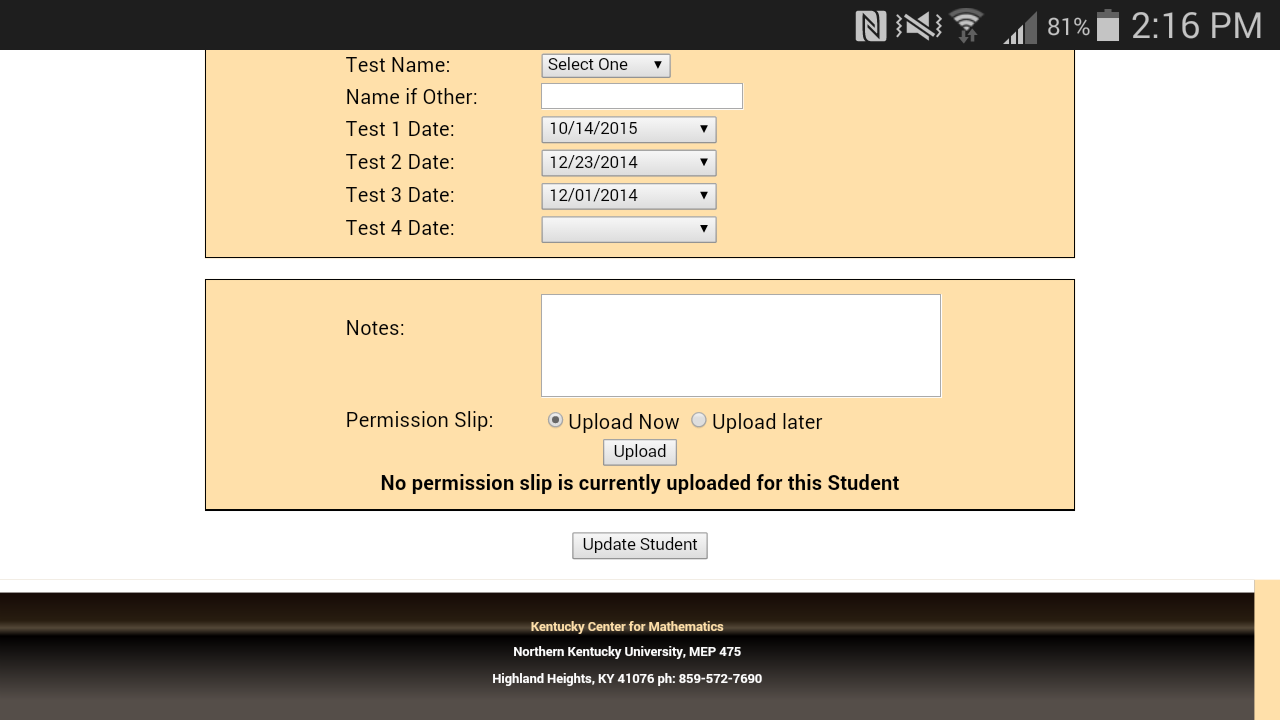
At the bottom of the screen, click 'upload'
-
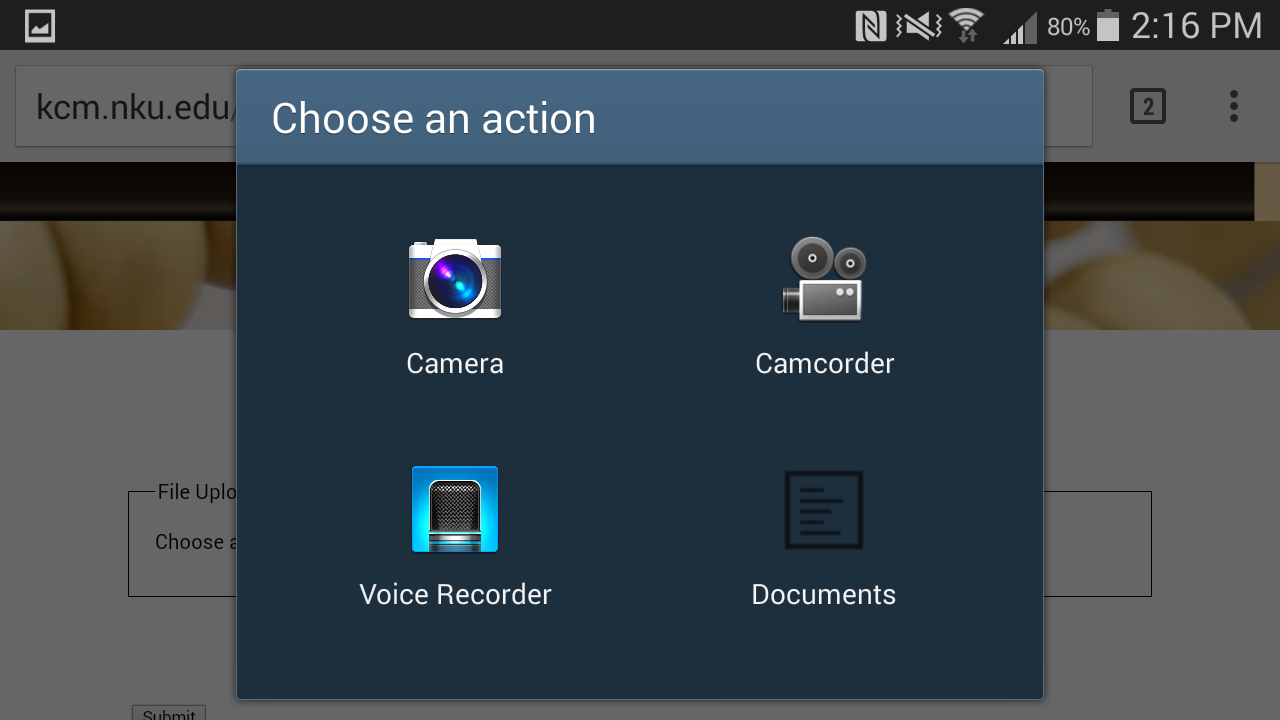
Click 'Choose File'
-
Click 'Camera' if you still need to take a picture of the consent form (Proceed to take the picture as well) or click 'Documents' if you already have the photo on your device (Proceed to find and select your picture)
-
Click 'OK'
-
Click 'Update Student' or 'Submit'
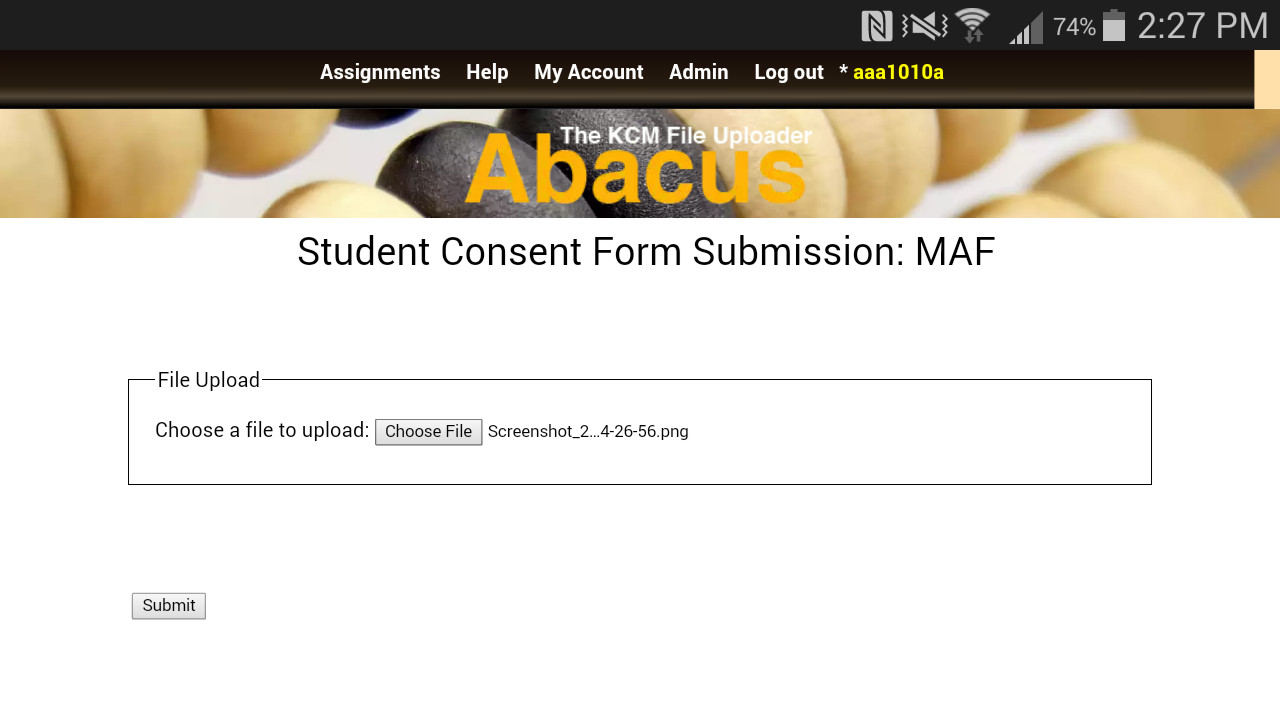
-
You will now be directed to the Student List screen. Choose or add the next student you would like to add a permission slip for
There is no way for you to delete a consent form for a student; however, you can override the consent on file by resubmitting the correct file.
Notification System
Click on a question below to see the answer.
The Abacus Notification System is a system that sends messages to users without the need to send an email to them for everything that happens on Abacus. This will prevent clutter in user's emails as well as help keep all messages organized. Abacus will send notifications based on actions that happen throughout the website such as file validation and new assignments.
Using the Abacus Notification System is simple. Once a notification has been received, you can view it by clicking on the Bell at the top of any page. Here you will see a popup that displays every unread notification that you currently have. Each notification behaves like an email, as in it has both a subject and a message associated with it. The subject is what you see when you click on the Bell. Clicking on the notification will then show you the full message of the notification.
In the popup from clicking on the bell, you can mark the notification as being read by clicking on the 'Mark as Read' button on that notification. You can mark every notification as read by clicking on the Clear Notes' button on the bottom of the popup. If you accidentally marked a notification as read, you can hit the 'Undo' button when a message pops up and it will mark it as unread again.
You can view every notification that has been sent to you by clicking on the 'View Notifications' button on the popup. Here you can view the messages of every notification that has been sent to you. There are options to mark a message as unread so that it can show up in your notification popup box or you can archive it if you want to save certain messages.
Every notification will be sent as a note or an email. A note is what we are calling the messages you recieve on Abacus. What you receive will depend on your settings. More information can be found in the next question.
No problem! Every notification is assigned a category, which determines how it is sent to you. If you would prefer to receive an email for a certain category (or all of them) you can change that by clicking on the 'User Settings' button in the top bar. There you can change how you receive each notification based on category. You can also reach this page by clicking on the Bell in the top bar and then clicking on 'Settings'.
We would love to hear your suggestions! If we missed anything or if you have another good use for the Abacus Notification System, please let us know by sending us an email at abacus@nku.edu.
Schoolwide Assessment Data
Click on a question below to see the answer.
NOTE: Most participants may not have authorization from their area to obtain the correct file. Attempting to follow these directions without authorization will make it impossible to complete the instructions as some buttons will not show up on your account. Please talk to the District Assessment Coordinator in your area and direct them to these directions so that they may obtain the correct file for you.
-
Log in to your NWEA/MAP account
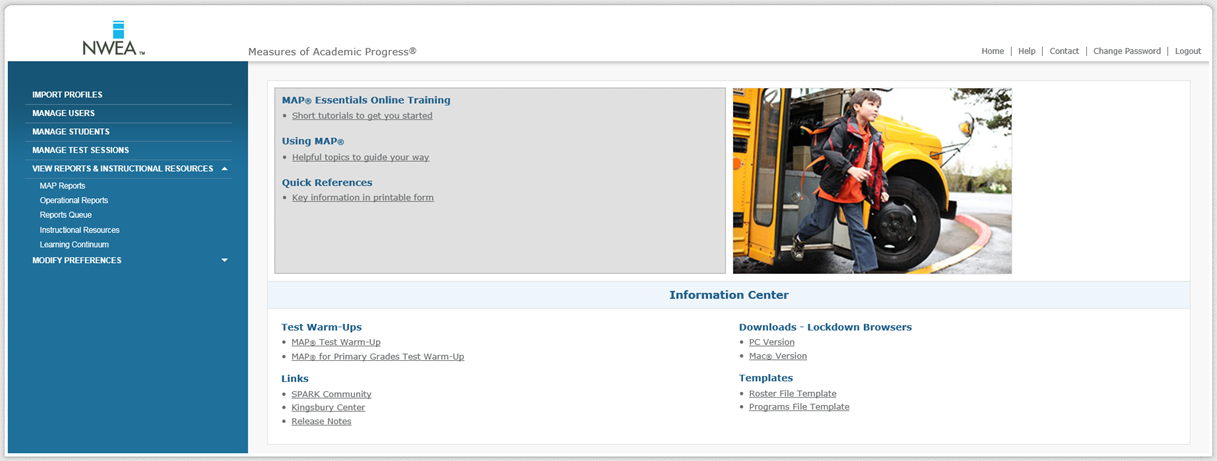
-
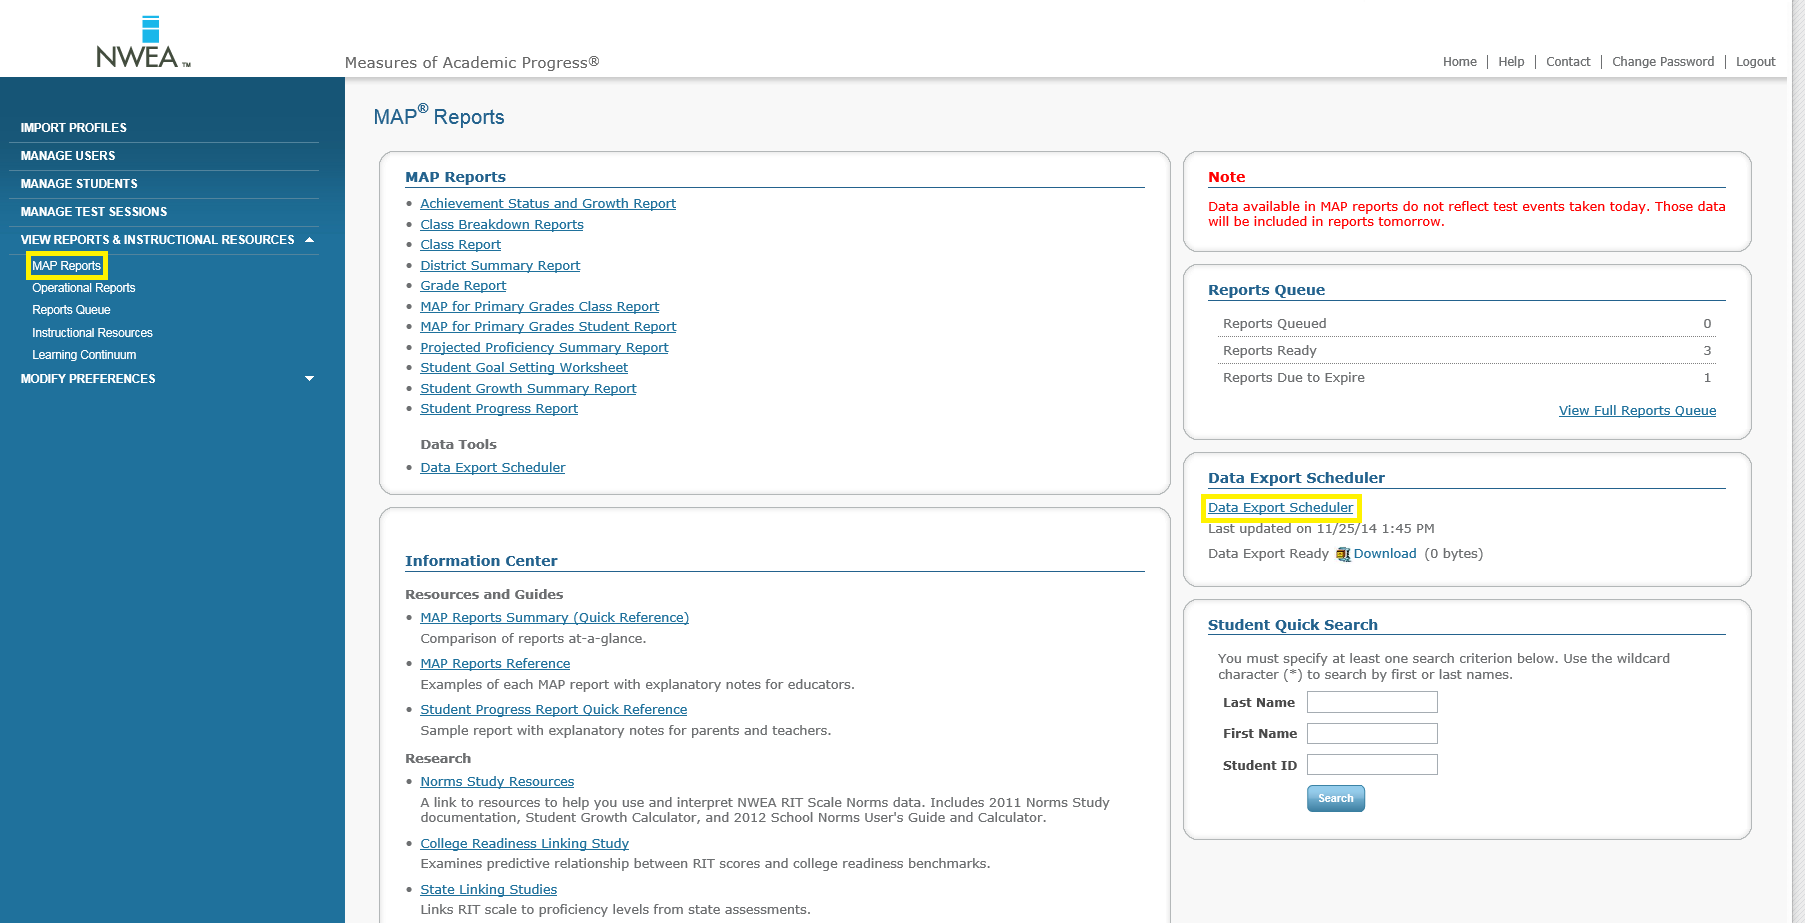
Click 'Map Reports' from the left-hand menu
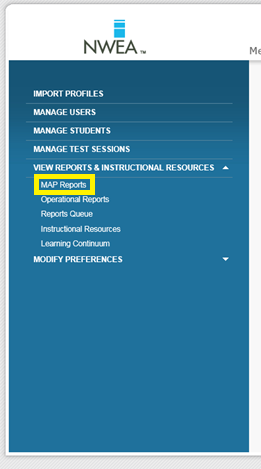
-
Click 'Data Export Scheduler' from the MAP Reports Menu.
NOTE: If you do not see this link then you are not authorized to download the correct file. Please read the note above for more information.
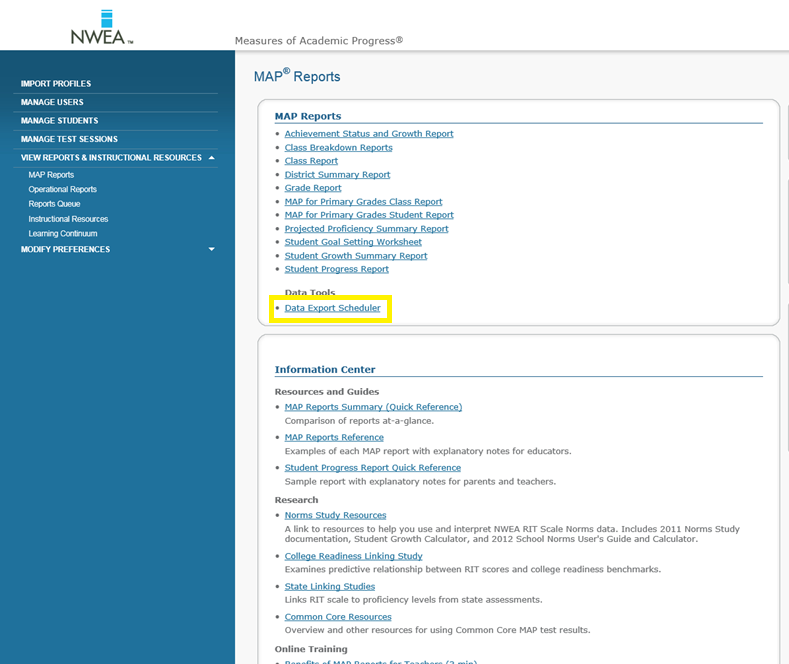
-
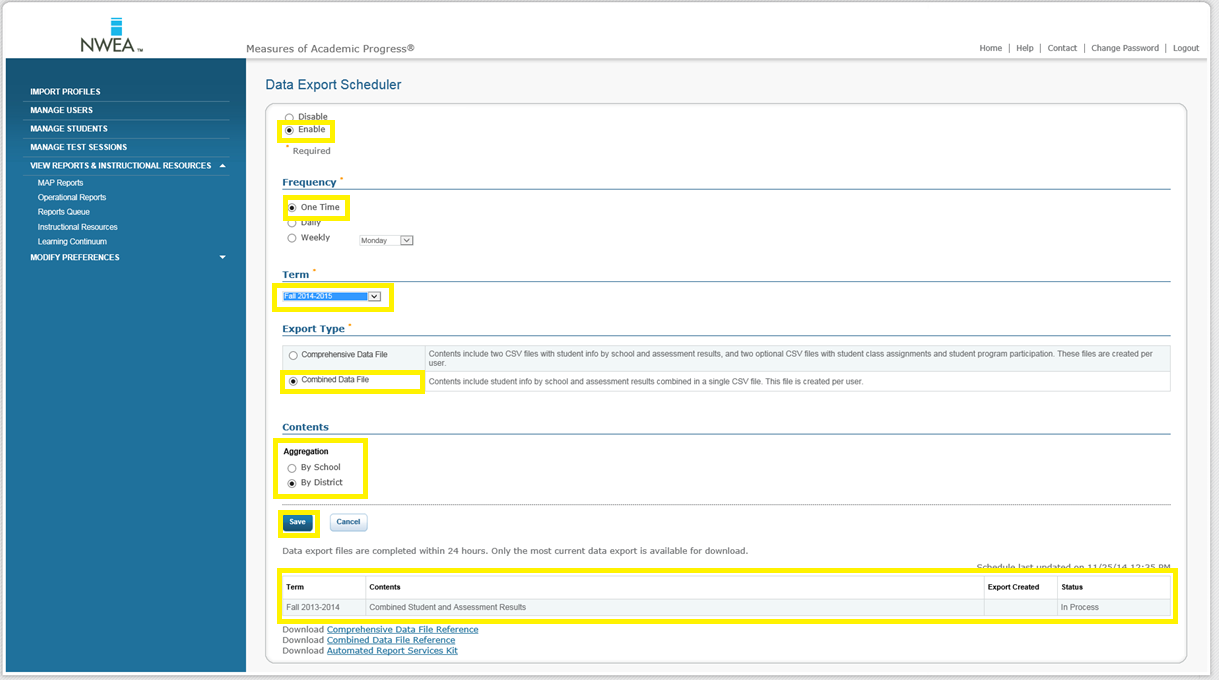
On the Data Export Scheduler window click 'Enable'
-
Select the frequency to be 'One Time'
-
Choose the term you wish to download
-
Choose export type 'Combined Data File'
-
Aggregate the data 'By School' if possible. If not, choose 'By District'.
-
Click 'Save'. You will now see a window on the bottom of the screen stating that the file is 'In Process'.
-
Logout of NWEA/MAP. Check back up to 24 hours later.
-
(24 hours later) Log in to NWEA/MAP, click 'MAP Reports', found on the menu on left-hand side of the screen, and then click 'Data Export Scheduler' on the right hand side of the screen.
-
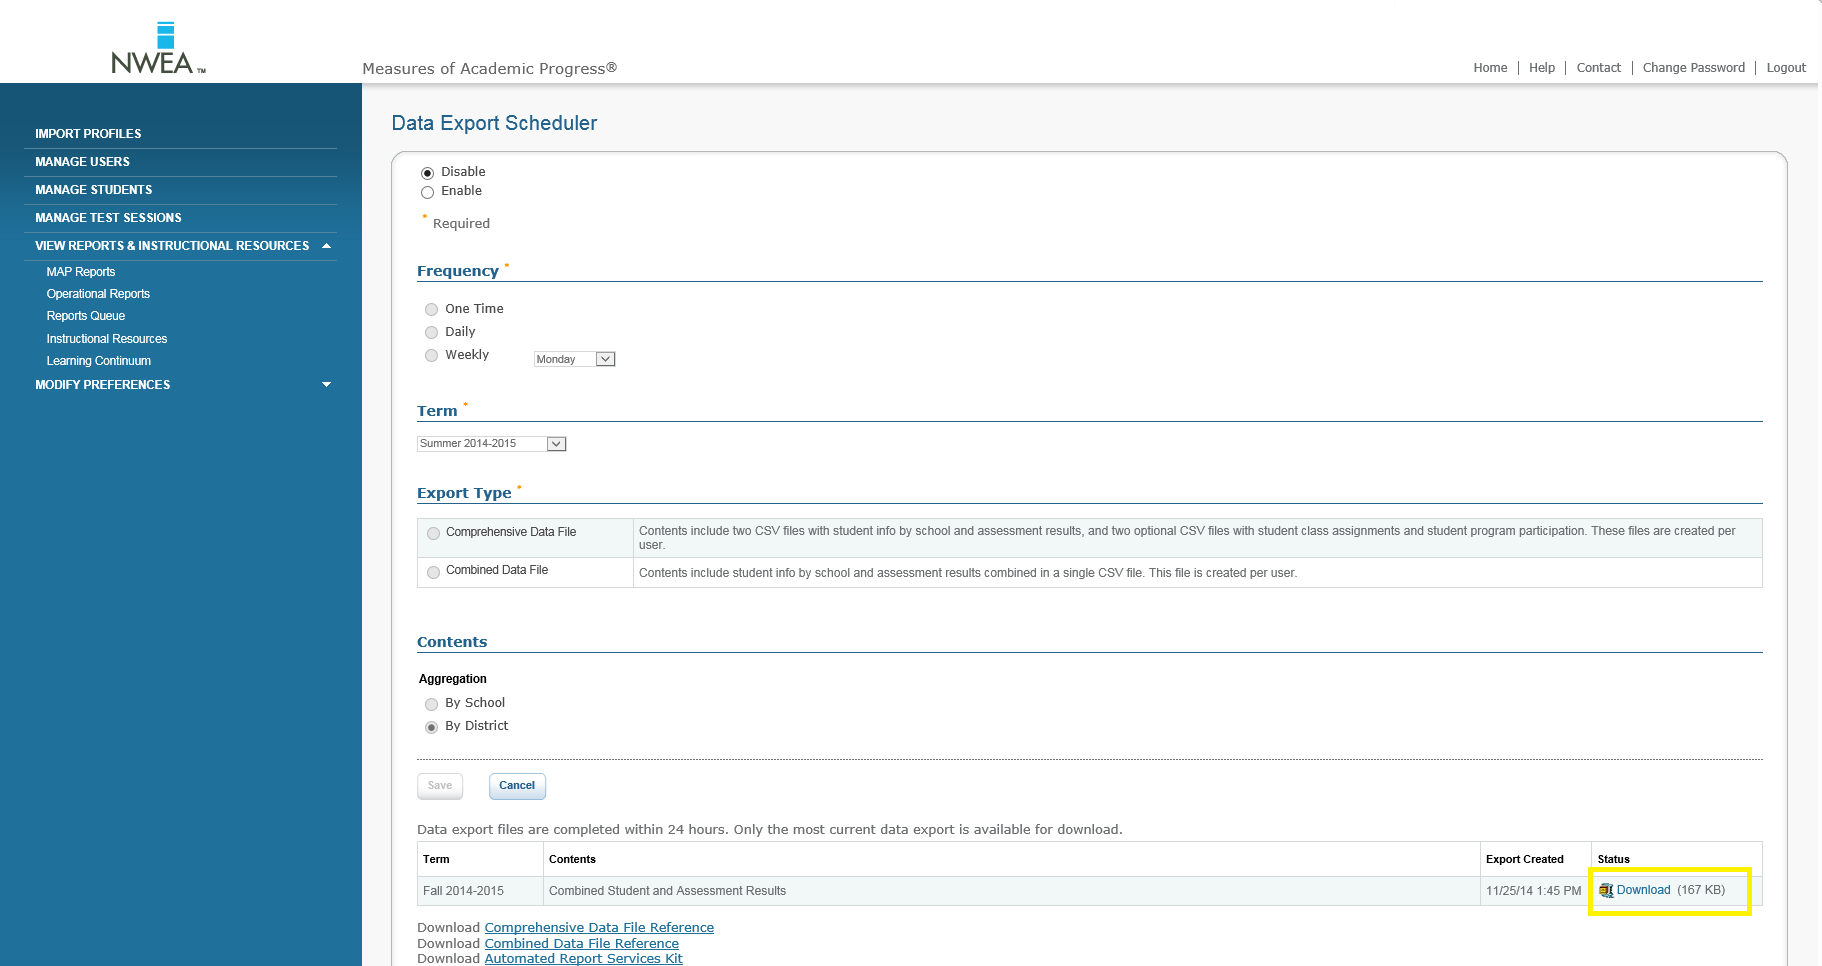
Click 'Download' at the bottom right-hand corner of the screen.
-
Upload the file to your schoolwide assessment assignment on Abacus.
NOTE: Most participants may not have authorization from their area to obtain these files. Attempting to follow these directions without authorization will make it impossible to complete the instructions as some buttons will not show up on your account. Please talk to theDistrict Assessment Coordinator in your area and direct them to these directions so that they may obtain the correct files for you.
-
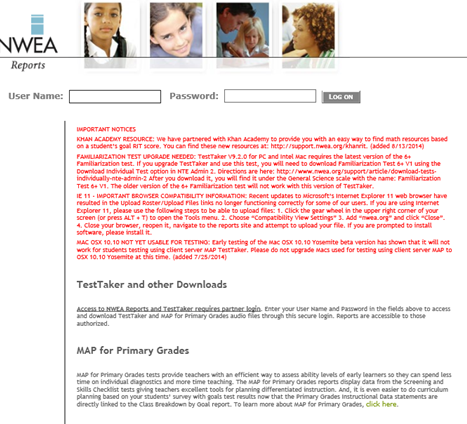
Enter username and password, click 'LOG ON'.
-
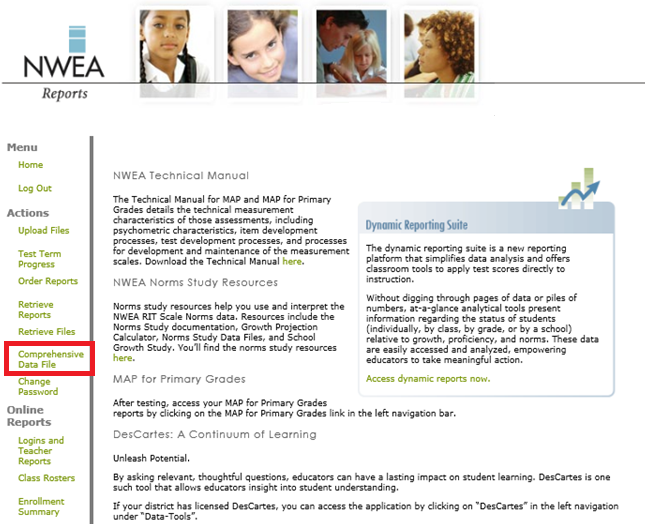
Click 'comprehensive data file'
-
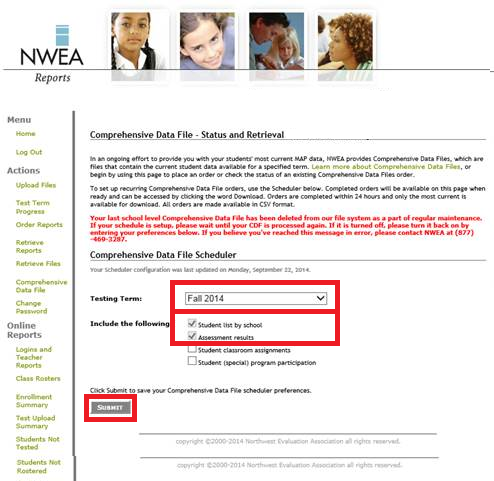
Choose the term and check only the boxes, 'Student list by school' and 'Assessment Results'.
-
Click 'SUBMIT'.
-
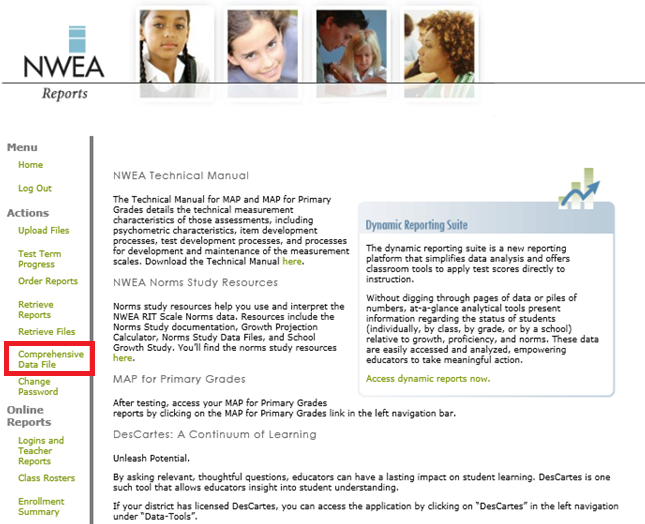
Sign out and wait 5-30 minutes. Sign back in and click 'Comprehensive Data file' again.
-
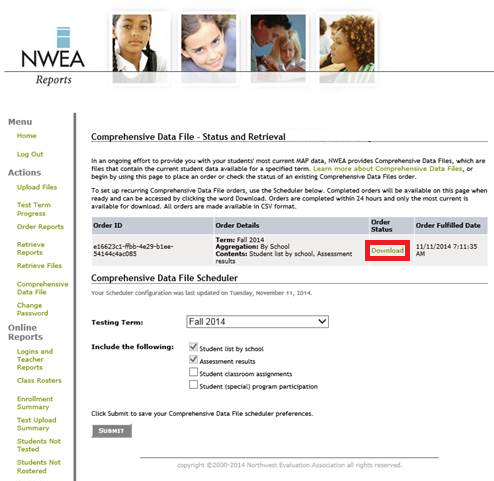
Your file is now ready to download. Click 'Download'.
-
Two files will be available: 'AssessmentResults.csv' and 'StudentList.csv'. Save the two files on your computer.
-
Upload the 'AssessmentResults.csv' file to Abacus under the Schoolwide data assignment using 'MAP' as the test type.
-
Click 'Add Submission'.
-
Click on the Schoolwide data assignment again, and click 'Add another file' (you should be directed to a new, blank form).
-
While on the new form, fill out the required information and upload your second file(StudentList.csv).
-
Submit the 'StudentList.csv' as 'Other' under test type.
-
In the 'Other Test Type:' box type 'MAP Student List'.
-
Click 'Add Submission'.
NOTE: Need to be able to pull data for entire school once percentiles are loaded.
-
Go to the Interim Benchmarks screen.
-
Select a Report.
-
Select Detail Export.
-
Fill in the Benchmark and Subject.
-
Select all appropriate grades.
-
Click .csv format.
-
Open the file that downloaded.
-
Check that percentiles are loaded. If percentiles have not been loaded yet, please wait and re-export.
-
Clear name columns.
-
Save as DOS CSV.
NOTE: Need to be able to pull data for entire school once percentiles are loaded.
-
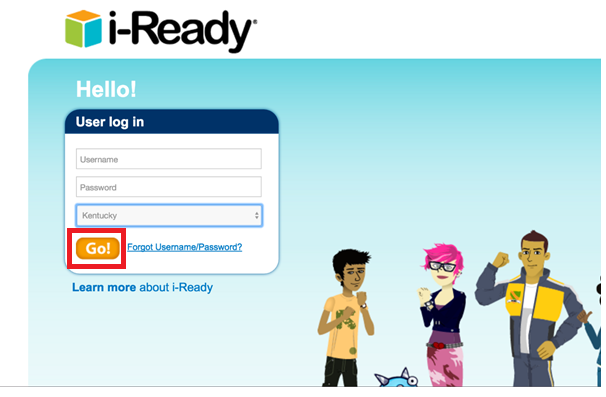
Go to the i-Ready log in page.
-
Enter Username and password, click 'Go!'
-
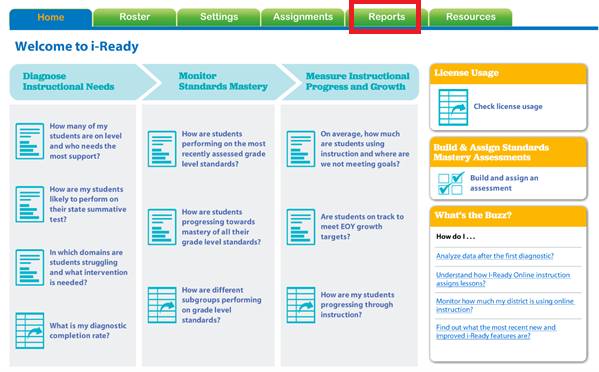
From the Home screen, click the tab labeled 'Reports'.
-
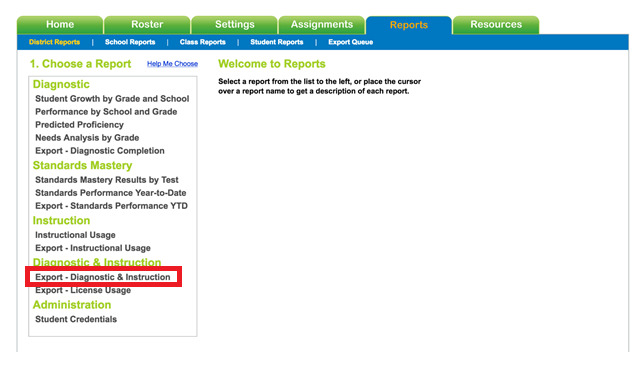
From the left hand menu, click 'Export Diagnostic & Instruction'.
-
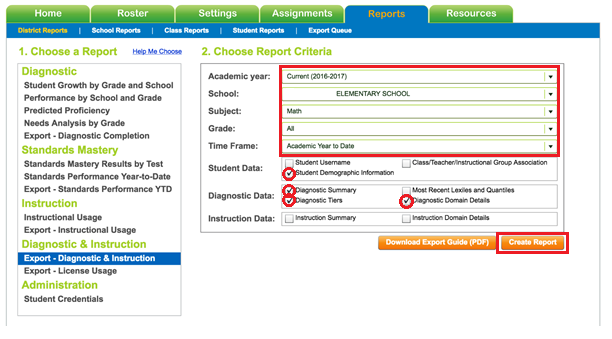
Enter the following information:
- Academic year (choose the current year)
- School (choose the applicable school)
- Subject (choose 'Math')
- Grade (choose 'All')
- eTime Frame (choose 'Academic Year to Date')
- Under Student Data check 'Student Demographic information'
- Under Diagnostic Data check:
- 'Diagnostic Summary
- 'Diagnostic Tiers
- 'Diagnostic Domain Details
-
Finally, click 'Create Report'.
-
Click the orange download arrow.

-
Save the file to your desktop.
-
Ask the STAR Administrator or your District Assessment Coordinator to give you access to schoolwide or district wide data exports. Or have them complete the steps below and submit the files on your behalf by contacting abacus@nku.eduto request a log-in for district personnel to submit schoolwide data.
-
Go to the Renaissance Place and login.
-
Go to the Web Transfer tool. (If you don't have access to this, reach out to your CDI specialist for information regarding the Web Transfer tool and credentials specific to your district.
-
Pull the Math File for your school.
-
Uoload this file to Abacus.
Unfortunately at this time we do not have specific instructions for obtaining the appropriate CASE file.
The file that we would like looks similar to the image below and should contain data for all students in the school with their student IDs, grade levels and scores.

The file can be an Excel file (.xlsx) or comma delimited file (.csv). The data for all students can be in one tab (worksheet) within the spreadsheet or in separate tabs, one for each class.
If you can provide specific instructions for producing this file, please contact Pam Reichelderfer reicheldep1@nku.edu.
On the School-wide Assessment Data Submission page, select the option from the 'Test Type' drop-down box that states: 'No testing conducted during this period -- explain in comment'. Then explain in the comment box why your school is not testing during this period.
Abacus does not allow you to delete a file. You can, however, correct an uploaded file.
-
Click the assignment where you uploaded your file before.
-
Go to the File Upload section and click the Choose File button.
-
Select the new file.
-
You will see a red message in the File Upload section

-
Click the Save button and the new file will replace the old one.
If you truly need to delete the submitted file rather than replace it, send an email to abacus@nku.edu.
Student Work Protocol
Click on a question below to see the answer.
You can download a copy here.
-
Go to your Assignments page where you should see three student work assignments listed. Each assignment has a different due date and a status.
-
Click on the student work assignment that does not have a status of "complete" and has the earliest due date.
-
The Student Work Protocol Submission page will be displayed. The page has five sections:
- Activity Description - describes the assignment that you are to complete.
- Task - provides a form to input information about the task that your students performed.
- Student 1 - provides a form to input information about the first of your three students.
- Student 2 - provides a form to input information about the second of your three students.
- Student 3 - provides a form to input information about the third of your three students.
You need to complete and submit the information in all sections. Once the submission is successful, you can upload any applicable files.
-
Enter the info about your task as requested. The Targeted Standards can be a little tricky. Select all that apply by holding down Ctrl and then selecting the standards one at a time. To unselect a standard, hold down Ctrl again and then click the standard to be unselected. If you click on the standard without hold down Ctrl, you will unselect all of the selected standards.
-
Complete each of the student forms. The first time you complete a student work submission form, you must enter the student ID and work level. These fields will be filled in for you on the second and third assignments. If you move your cursor to any of the circled i's, a short description of the information being requested will display. If the student was unavailable to perform the task, click the box next to "Student unavailable"; you will not need to enter any of the other information for that student.
-
When you have completed all sections, click the submission button at the bottom of the page. If the submission was successful, you will receive a popup message. If there were errors, you should see popup messages pointing to each error.
-
Once you have successfully submitted the form, the submission page will be redisplayed with file upload buttons shown in the task section and each of the student sections.
-
If you have files to upload, go to the appropriate section and click the orange upload button. (NOTE: There are separate upload buttons in each applicable section. It is important that you upload files using the button in the appropriate section so that the files are labeled correctly.)
The file upload page will be displayed. Click "Choose File" and select the file from your pc to upload. The file upload page will redisplay with the name of your file shown. Click "Submit File" to finalize the upload. The file upload page will be redisplayed with the newly uploaded file included on the uploaded files list. Continue to upload files as many times as neccessary.
-
When you finish, click "Go Back" to return to the submission page where you will see the name(s) of your newly uploaded file(s). Repeat the upload process for each section as needed.
Yes. Even though the assignment is marked as complete, you can still go in and make changes at any time. If you need to change an uploaded file, just reupload it with the same filename as the original. The upload process will identify the new file as a duplicate and ask you if you want to replace the original. Just press "Save" to complete the replacement. You may also delete files by clicking the delete button next to the desired filename.
Several different people will be looking at your entries:
RC assigned to your school - She will be looking at your entries to see how she might assist you. Don't be surprised when she approaches you with questions or suggestions based on your entries.
KCM program evaluators - The KCM is always looking at how well their programs are doing. Your entries will be used to judge the success of the professional learning and assistance that the KCM provides and to determine improvements.
MAF program evaluators - Your entries will also be used to judge the success of the MAF program and to determine how it might be improved.
If you have problems with Abacus and the submission process in Abacus, you can send an email to abacus@nku.edu. If you have questions about the student work protocol itself, ask the RC assigned to support your school.
